Showing posts with label painting. Show all posts

Monday, March 4, 2024

Tree of Giving - Hand Painted Mural

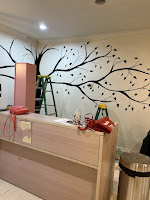
 A mural painted at a local dog rescue with my friend, Pam. This is in the reception area for the rescue building.   

This entire tree was done in black acrylic paint. The start was to center the trunk in the corner of the room. Then bring the branches out and up. (happy trees = branches up, spooky trees = branches hang down a bit) 


We did one side, then moved to the other the following day. Adding a few more branches and then the leaves. Most are kind of heart shaped. Start with a V at the end of the branch then round out the top and twist the brush to meet at a point at the end of the leaf. 


A few special touches! 

The third day was simply clean up and touch ups. The wall had a texture stucco and it was challenging to paint a straight line. 

Craft foam leaves will be used to mark donations. So supporters can add a leaf to our Family Tree! 


Finished! 


Three days of up and down ladders was exhausting but I think it came out okay. What do you think? 

Foster! Adopt! Rescue!

Sunday, January 16, 2022

Keeping Crafty in a Busy Life

 I recently moved to Florida so life's been a bit hectic. Working, settling in and all that stuff. Then there's that nasty covid thing. So far we've been lucky and vaccinated, but still it's a big issue in meeting people and making friends.  

I've still been painting and trying to keep crafty but it is a challenge. The house we're renting is small and my craft room is a jumble of stuff that doesn't fit any place else. Isn't that always the way? It's like the world sees our craft rooms as that spare place to store stuff. Frankly it messes with my creative flow. It's like writer's block. Crafter's Block? That has to be a thing. Most of the stuff that used to be out and in sight is stuffed in a box and crammed into a closet. 🤦

One of these days I'll reveal the before and after of this craft/office/storage fiasco when I can figure out how to reorganize it (again.) But right now it's just too much. 

And my piano desperately needs tuning. - but that's another topic. 

Then I painted sunshine gnome just because. 


Sunday, May 31, 2020

Bird Bath Cover Up

There was this ugly sewer tap in thing in our back yard. I hated it from the minute we moved in and thought long and hard on how to cover it up.

So, what does every back yard need besides a bird feeder to attract those cute little feathered beauties? 

A Bird Bath, of course! 

Hubby made this box from plywood. Just cut four equal pieces and nailed them together to fit around that sewer pipe.

Next; Bright blue spray paint. 

Then I took chalk and drew some flowers and birds and painted on some whimsy. 

After it was all done I used a spray sealer with UV protection so it would withstand the rain and sun. 

Once that was dry we glued on one of those bottoms to a flower pot. I think it was maybe $3 in Lowes. We used an all weather glue to hold up to the elements. 

Finished! Easy Peasy Bird Bath Cover Up! 

Monday, February 5, 2018

Painting Dragonflies & Sunflowers

It's just a cold, blustery day in the north east and there's no way I wanted to brave the frigid temps, so it was either work on my next book or pull out the paint.

Guess which one won? :)

This canvas had another painting on it that just wasn't working out. So I mixed some green, blue and yellow and blocked out the old stuff.

Then did the center of the flower in shades of brown, yellow and black. The petals were done in two shades of yellow and green. A little of the brown mixture was streaked up through the petals for texture. The dragonfly (first time I ever painted one!) was done in light and medium purple, blue, black, and white.
Sometime ya just gotta have some fun. 
Paint on my friends! 


Saturday, January 6, 2018

Snow Days & Frigid Temps

Here in the North East we're in below 0 temps and hiding in the house. Fire in the wood stove, wine is poured and it's a great time to CREATE!

We're looking to sell our house and move so my art studio is packed up in boxes. Wahhhaaaa!

So my awesome family got me a few things for Christmas. Brushes, canvases, and an easel. All I had to get was some paint. Forgive the quick pics. I'm not sure what I'm going to do with these yet, might just go in the closet with the rest of the artworks. :)

As the temps drop, I'll be filling some canvas with day dreams.


How's by you? Keeping safe and warm?

What's your cold weather craft?


Saturday, August 6, 2016

St Patrick's Day in August

We were having a St. Patrick's Day party in August at work and you know what? It's almost impossible to find St. Patrick Day decorations in the middle of summer. So I decided we needed something creative.

I bought a piece of wood at Lowes, it was thin, RevolutionPly 5mm. My husband cut it in half and we glued the two pieces together to make it stronger. Then he screwed 1" x 2" boards around the outside edge for extra reinforcement.

For the stand he cut two triangles out of plywood (1/2 in thick) and cut slots in them so the board would slip in to stand up.

Once we had the board all put together, it was time to lay out the design. I wanted the the Leprechaun faces cut out so people could get behind them and take photos. So I sketched the picture with a piece of chalk and my husband cut the faces out.

Now it was time to paint.

Confession; Lowes was selling the Valspar paint samples for a buck...OMG! I had a big background to paint so this was a great economical find. It was hard to restrain myself to just a few. I think artist everywhere were dancing.

Then it was just paint...and touch up...and touch up

 I used my Silhouette Cameo to cut vinyl for the Happy St. Patrick's Day" and e shamrocks and put them on the final picture.

To add a little dimension I used Washi Tape from Michaels for the front of the Leprechaun's vest on the left and some gold ribbon for the front of the vest for the Leprechaun on the right. I glued them on with Tacky Glue and taped the ribbon until the glue dried.


Happy St. Patrick's Day in August!


Sunday, November 8, 2015

Easy DIY Crafting for Mirrors

When we were talking about selling our house I'd read that mirrors can help make the rooms look bigger. I wasn't about to invest in a lot of expensive mirrors just to either have to  move them or resell them, so I went garage sale-ing!

I got a couple of long ones and two portrait sized mirrors. None were in great shape, but I always believe a little elbow grease and paint can fix anything. So we scooped them up, threw them in the back of the pick up and away we went.

Mirror 1


I did two of the longer ones first and had a heck of a time with the paint. Even though I sanded them good, these puppies must have had a gallon of polish or something on them. The paint was rising in oily pools. They took coat after coat to get a decent look. (Note to self; scrub with Dawn dish detergent next time)

Since the room we would place these mirrors in was white, I painted them a deep peaceful blue. Please forgive the background. It's not hung yet, just leaning on the dresser in my office.


Mirror 2 

My next mirror was interesting but I thought, a little dated. The stained glass on top was really just painted on. It had a bumpy texture but since it was over mirror I wasn't sure I could sand it off. So I flipped it over and painted the reverse side white. My plan at that point was to put vinyl letters on it and then paint it black, and peel the vinyl off to see the white word.

But did I want another mirror at this point? I wasn't even sure why I got this one or where I'd put it. So I popped out the mirror and used chalkboard spray paint on it. :)
The frame got a bright blue/teal-ish coat of spray paint. (Valspar brand spray paint =Exotic blue) I decided I liked the white with blue letters on top as a contrast to the blackboard so I kept it. What do you think?


Now this hangs over my desk for inspiration and note taking!


Saturday, October 10, 2015

DIY Halloween Art Projects

 Simple golf balls make cute jack-o-lanterns when spray painted orange. Paint on faces with black craft paint. Green leaves on top finish the look. To hang these cute little golf balls we drilled a small hole in the top and screwed in a round hook.
 Another option is to paint eyeballs on the golf balls and suspend them from fishing wire. Nothing more freaky than floating eyeballs! 


Don't forget the PUMPKINS!


I was never a good carver of pumpkins so I use paint to bring out their personalities. When one of my daughter's friends was throwing a Halloween party she asked for a character from Harry Potter.
Say hello to Darby, the house elf! 
What's Halloween without a black cat? This little charmer peeks out from inside a pumpkin to wish everyone a HAPPY HALLOWEEN! 

Monday, October 5, 2015

Pegboard Upcycling? Or DIY Liquid Courage?

I made a pegboard to store my art supplies and get them organized. You can see that pegboard here. 

I had half a pegboard left over. About 4' x 4', it was sitting here staring at me asking me to do something with it. :)
I didn't have room for another storage wrack, but I did have lots of spray paint so I took it out in the back yard and just started spraying.

After a while it looked like a face.... so I kept going.

Everyday after work I went into my studio and just layered on more paint. I knew I wanted bright colors and a lion.

So there was more paint...

Some squiggly brush strokes and more paint.


After a couple of days I wondered what I would do with it when I was done. But I kept going.
Painting on a pegboard is a challenge. All those little holes hold the paint and cause drips.

I kept painting.
I'm lucky my family understands me. . . or at least pretends to.


After a while I realized that the facial features would be a challenge due to the odd placement of the little holes. Ignore them and keep going? Work around them?

And now it's done and I still don't know what to do with it! But it felt good painting it and I kinda like his eyes.

ROAR!


Monday, September 28, 2015

Painting off the Canvas

Daughter's Dresser
Using a canvas is the most conventional way of creating a work of art. But let's step off the canvas for a bit and find other things to splash the paint on. ;)

Furniture is becoming the more popular new canvas for artists. Sure, people have been painting furniture for a while but lately I'm seeing more creative sparks on this style. Bold, bright colors, unique designs have brought furniture art into the spotlight.
Funky Dresser from Home Decorating Secrets

Check out Pinterest for some great pieces.  Some fit into the more conventional home, others make a louder statement.

Home Decorating Secrets had this funky piece of furniture on their blog.


If furniture isn't your thing or you're just not ready to tackle a big project find some rocks and try out Lin Welford's rock painting techniques. 


Then there's walls (my favorite place to paint!)

Let's paint!
Share your links and tell us what you're painting!


Friday, September 18, 2015

Inexpensive Art Studio Storage ~ Pegboard

My art studio was a mess. Like every artist, I was constantly accumulating paints, brushes, and anything I could paint. (Furniture, little boxes, rocks...)

While cruising Pinterest, I came across the a pegboard with a DIY frame. It gave the board a finished look so I just had to make one!

Off to Lowe's to buy a pegboard and some molding I could use as a frame.

For the board, I thought about using a lot of colors, but worried it might look messy once the tools were hung on it. Instead, I put a coat of white paint over the board for a clean look. I used one coat of basic white and applied it with a roller. I had paint brush nearby in case the little holes clogged but it really wasn't a problem.


Since I've never used a power tool in my life, my husband cut the molding to make the frame. A bright blue (Exotic Blue) spray paint for the frame took about 3 coats to cover. There was also some touch up to get the paint to look smooth and even.

Let it dry overnight and then used wood glue to get the frame to fit and then nailed it together.

Instead of attaching it to the wall my inventive husband used aluminum T-stock to attach the pegboard to my workbench.  

                       Another quick trip to Lowe's for a pack of pegboard hangers                             and here's what I got. Organized and ready to paint! 

Tuesday, September 15, 2015

How Should You Plan Your Canvas?

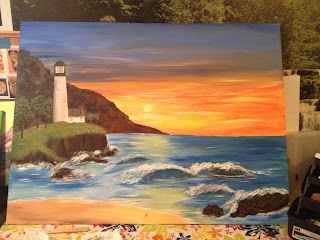
Ignoring the basics was my biggest mistake when I started a big canvas. I wanted to put a lighthouse, cliff, rocks, and a beach. What I should have done was sketch it onto the canvas. What I did was just start slapping on the paint.

The result was an uneven horizon line, an out of perspective lighthouse and waves that didn't make sense. The sky has a bit of a transition problem, too. All on a large 3' x 4' canvas.

However, it needs fixing. A wise artist friend once told me just watching the work will go a long way in getting the brain to click and the answers to come.

So I'm staring...waiting...and knowing it will click sooner or later. I really don't want to give up.

Planning, it's all in the planning...

Next time I'll do the sketch first and maybe the outcome will be better. 

 How do you plan your canvas? Sketch it out or just slap on the paint?

Sunday, September 6, 2015

Bookcase Makeover

 I have this old bookcase, once painted white to match my daughter's room. She's grown up and moved out and I had to do something with this well worn, yet sturdy piece.

First, I pried off the back and sanded down many layers of paint. Then, two coats of semi-gloss paint in a bright color on the frame (in my favorite color.)


While that was drying I got out some craft paper and Mod Podge. I've never used this stuff before so it was a challenge. I laid out my paper and trimmed the edges to fit. I spread some Mod Podge with a fine paint brush and carefully laid the paper down and pressed out the air bubbles. Once it was in place and looked good, I moved on to the next sheet.

After all the paper was Mod Podged down, I put two coats of Mod Podge over the whole thing.

Confession; After getting them all down with the Mod Podge the first time, there was a major air bubble on the middle of one sheet. I made the big mistake of trying to smudge it out when it wasn't quite dry yet and ripped the paper. ArrGGGhhh! I had to peal that piece off as best as I could, sand a bit, wipe it down and then put on another sheet of craft paper. Good thing I bought extra!

Once finished I let it dry over night. If this had been a table or something that would have gotten a lot of hands on wear and tear, I would have let it dry for 4 days and then put on a more protective finish.  Back of a bookcase? I nailed it back together the next day. And here you have it!

 If I had it to do over again I might have YouTubed how to do Mod Podge and maybe avoided my air-bubble mistake.

I'm using this for a storage shelf in my art room and I'm pretty happy how it came out.

Now I've got my eye on that worn little end table in the living room....

Happy painting!
Tuesday, July 28, 2015

To Art or Not to Art ~ Is that a Question?

Please excuse messy studio. The jobs are piling up!
Life throws crazy things at us. Some good, some bad, some just time consuming. All these things can throw a monkey wrench into creating art.

I've been working on this stool for too many weeks now. Not that I'm that prolific a painter, but with a simple design, I'm usually better than this...

The worst part? I'm doing this as a gift!

My home is suddenly under construction. My studio is being moved to the other side of the house as we create a new master bedroom. This meant taking down the wall between my studio and a spare room. I'm happy this will make an awesome new bedroom with walk in closets, but I cried when they took down that wall. My studio was the place where time didn't touch, where my soul opened up, and I could breathe. For now it's gone.

There's a bedroom down the hall I'm going to claim as a studio when all the construction is done, but that's going to be a few weeks. Right now I'm working in the kitchen. Tarp goes down on the floor and there are paints and brushes all over the table. My toolbox/rolling art studio (thanks you Sears!) sits behind the recliner and I'm doing my best to keep going. Still, work is slow...

Half way there...
So here's where I'm at now. Basic lines are in and trying to carve out time when the kitchen isn't busy and I can get back to work.

Tuesday, June 30, 2015

Three Habits that Build an Art Career

Art, like any self-motivated job, takes discipline. Even a driven artist can be sidelined by family obligations, a day job, other creative endeavors, and life. Coming home from the day job with your brain fried from work demands, family clamoring for your attention, and a house that might need attention (dishes, laundry, etc,) can push your art to the back seat. It's life, it happens.

How to break free from this cycle of un-productivity?


  • First show up. Go to the place where you do your art. Walking into your studio or even just up to the table where your brushes, paints, and artistic equipment lives will help to inspire you to start. 
  • Carve out time. Let your art be your job. Go to it religiously. Set the time. Label an hour or two of your day for art and make it a priority. If you go over that time, great! 
  • Alert the masses. Let the people in your life know that this time is scheduled for building your art career. Explain how important it is to you and ask for their cooperation in giving you this time to work uninterrupted.

Finally, accept the importance of Art in your life. Too many times we push creativity aside out of guilt, obligation, or just plain laziness. More Art to the top of your priority list and take the first step in creating a career as an Artist.

Go forth and create beauty in the world.

Sunday, May 31, 2015

Scary Part of Being an Artist


Lots of people love to create great works of art that they hide in the closet.  They take the time and passion that they put in each piece then surrender to fear. I believe this happens to every creative person. So many wonder if their art is good enough, or amateurish or just plain stupid.                                                                                                       I did. For a long time stuff just got shoved in the closet. Am I a great artist? Eh. 

But something happened at one point where I just decided not to care who would like it. I thought about Thomas Edison and Alexander Graham Bell. When they were toiling away making their crazy inventions, did they care that some people were looking down their noses thinking they were freaks? Or did they just keep going? Were they not artists of their own crafts?                                                                                                                                               Vincent Van Gogh didn't have such an easy time with his art. He was thought of as weird, maybe deranged, and died way too young. He never got to see how his art would be appreciated, yet still he painted. If I could time travel I'd go back and bring him here, to the MOMA in NYC, and show him all the people who stand in front of Starry Night taking photos and admiring the genius of his art. It would be wonderful to let him know he is loved today. That his art is loved.                     

Gifting my art helped suppress the fear. Some of the things on this blog were done as gifts. People seemed to like it and would tell me others were asking about it. I don't know if that's what made me feel braver or if, as i got older, I sort of came to a mind set that it is what it is. Some of it I love, some of it's goofy, some of it's fun. Overall, I just want to keep creating, painting, woodworking, stain,  and exploring new mediums.

I always tell my fellow artists and writers to "Let it Fly!" Send that art out into the world and stop worrying. Let those who love us love us and those who don't, don't really matter.                                                              
                                                                                      Go out and create and remember those who laughed at Van Gogh and Edison eventually came around to love them. Perhaps their souls grew a little and they learned something.                                                                                                                                                   Bottom line? All art is beautiful to someone, but you'll never find that someone in your closet. Set your art free and let it fly out into the universe. You'll be happier for it. Freedom is a wonderful thing.