Thursday, December 3, 2015

Grounds for Sculpture

 My cousin clued me in to Grounds for Sculpture in Hamilton, New Jersey.

This place was amazing. Started by artist, Seward Johnson in 1984, it is an interactive museum where you can walk among these life size and larger sculptures.

A great place to bring the kids where they can see and touch pieces of art history and discover new artists. Most of the sculptures here are reproductions of famous paintings or images. Seeing them life size with so much detail will amaze you. I know it did me! We had a wonderful time walking around these great works of art and goofing for the camera.

I can't write enough to explain the visual excitement of this place so I'll let the photos do the talking. See how many of these sculptures you recognize from the original famous works.
Enjoy!


Monet's Waterlilies.  


Seward Johnson's 9/11 sculpture
Grounds for Sculpture is also home to a flock of peacocks that wander by while you're taking in the art. This was a real live white peacocks. 
Go visit the peacocks at Grounds for Sculpture and tell them I'll be back! 


Sunday, November 8, 2015

Easy DIY Crafting for Mirrors

When we were talking about selling our house I'd read that mirrors can help make the rooms look bigger. I wasn't about to invest in a lot of expensive mirrors just to either have to  move them or resell them, so I went garage sale-ing!

I got a couple of long ones and two portrait sized mirrors. None were in great shape, but I always believe a little elbow grease and paint can fix anything. So we scooped them up, threw them in the back of the pick up and away we went.

Mirror 1


I did two of the longer ones first and had a heck of a time with the paint. Even though I sanded them good, these puppies must have had a gallon of polish or something on them. The paint was rising in oily pools. They took coat after coat to get a decent look. (Note to self; scrub with Dawn dish detergent next time)

Since the room we would place these mirrors in was white, I painted them a deep peaceful blue. Please forgive the background. It's not hung yet, just leaning on the dresser in my office.


Mirror 2 

My next mirror was interesting but I thought, a little dated. The stained glass on top was really just painted on. It had a bumpy texture but since it was over mirror I wasn't sure I could sand it off. So I flipped it over and painted the reverse side white. My plan at that point was to put vinyl letters on it and then paint it black, and peel the vinyl off to see the white word.

But did I want another mirror at this point? I wasn't even sure why I got this one or where I'd put it. So I popped out the mirror and used chalkboard spray paint on it. :)
The frame got a bright blue/teal-ish coat of spray paint. (Valspar brand spray paint =Exotic blue) I decided I liked the white with blue letters on top as a contrast to the blackboard so I kept it. What do you think?


Now this hangs over my desk for inspiration and note taking!


Monday, October 12, 2015

5 Essentials for the Home Art Studio

Every artist needs a place to call their own. Be it just and easel  in the corner or a whole room to themselves, a place to craft will lift the artist's heart and set their creativity free.

What's essential to an artist's space? Here are the 5 must haves;

1. Good lighting. Essential for creating art. Place your work area near a window or invest in a good light. Although nothing beats natural light, making sure you have access to a good craft light will give you the freedom to create day or night.

2. Place for tools. Tin cans, glass jars, anything you can store your necessities in. Watch for sales on standing tool boxes at your local hardware store. They have lots of drawers to store brushes, paints, and glue guns. A shelf or peg board would be great to keep them off you're desk and give you a bigger work area. See a peg board idea here. 

3. Storage for Creations. Whatever your medium, you'll need somewhere to stash your goods. Canvas, rocks, wood, or whatever your artist eye needs. Wooden crates, shelves, or even a nearby closet if you can spare the room, can be used to keep things organized.

4. Access to water.  Most art requires some water for the creation or the clean up. A perfect place would have a deep sink to clean brushes, pallet knives, or whatever.

5. Privacy. This one is hard in some households, but art takes concentration. If you have a place where you can block out the world for at least a few hours, you're lucky.

So what does your Art Studio have? What does it need? 


Saturday, October 10, 2015

DIY Halloween Art Projects

 Simple golf balls make cute jack-o-lanterns when spray painted orange. Paint on faces with black craft paint. Green leaves on top finish the look. To hang these cute little golf balls we drilled a small hole in the top and screwed in a round hook.
 Another option is to paint eyeballs on the golf balls and suspend them from fishing wire. Nothing more freaky than floating eyeballs! 


Don't forget the PUMPKINS!


I was never a good carver of pumpkins so I use paint to bring out their personalities. When one of my daughter's friends was throwing a Halloween party she asked for a character from Harry Potter.
Say hello to Darby, the house elf! 
What's Halloween without a black cat? This little charmer peeks out from inside a pumpkin to wish everyone a HAPPY HALLOWEEN! 

Monday, October 5, 2015

Pegboard Upcycling? Or DIY Liquid Courage?

I made a pegboard to store my art supplies and get them organized. You can see that pegboard here. 

I had half a pegboard left over. About 4' x 4', it was sitting here staring at me asking me to do something with it. :)
I didn't have room for another storage wrack, but I did have lots of spray paint so I took it out in the back yard and just started spraying.

After a while it looked like a face.... so I kept going.

Everyday after work I went into my studio and just layered on more paint. I knew I wanted bright colors and a lion.

So there was more paint...

Some squiggly brush strokes and more paint.


After a couple of days I wondered what I would do with it when I was done. But I kept going.
Painting on a pegboard is a challenge. All those little holes hold the paint and cause drips.

I kept painting.
I'm lucky my family understands me. . . or at least pretends to.


After a while I realized that the facial features would be a challenge due to the odd placement of the little holes. Ignore them and keep going? Work around them?

And now it's done and I still don't know what to do with it! But it felt good painting it and I kinda like his eyes.

ROAR!


Thursday, October 1, 2015

Other Art & Artist Blogs

I was surfing for some blogs about Art and it was harder than I thought it would be. I don't know if this was because there just isn't a lot of them, (that's impossible!) or if the key words just weren't there.  A lot hadn't been updated in years. :(
I wasn't looking for NYC top artists, I want to meet the everyday artist. Average folks who reach beyond everyday life to create amazing art.

After surfing around for a while here's a few good ones. Check them out!

Artists Helping Artists; is out of Australia, (gotta love that country!) and it has tons of stuff to help you become a more successful artist. I've only just touched the surface of their content but it's definitely top of my fav blog list.

Lisa Congdon's Today is going to be Awesome blog. Has some pretty impressive content covering sketching and knitting.

Gapingvoid Blog is interesting and I need more time to scope out all the articles. Most were short but entertaining.

The Empty Easel has some good articles to encourage artists to blog. Not sure it can be considered a blog.

I was over on HomeTalk (has lots of painted furniture) and found Tidbits and Wine. More of a design site, but I loved this article on color. 

Got an art blog? Post it in comments and I'll add it to Crazy Painter Art's blog roll!


Monday, September 28, 2015

Painting off the Canvas

Daughter's Dresser
Using a canvas is the most conventional way of creating a work of art. But let's step off the canvas for a bit and find other things to splash the paint on. ;)

Furniture is becoming the more popular new canvas for artists. Sure, people have been painting furniture for a while but lately I'm seeing more creative sparks on this style. Bold, bright colors, unique designs have brought furniture art into the spotlight.
Funky Dresser from Home Decorating Secrets

Check out Pinterest for some great pieces.  Some fit into the more conventional home, others make a louder statement.

Home Decorating Secrets had this funky piece of furniture on their blog.


If furniture isn't your thing or you're just not ready to tackle a big project find some rocks and try out Lin Welford's rock painting techniques. 


Then there's walls (my favorite place to paint!)

Let's paint!
Share your links and tell us what you're painting!


Friday, September 18, 2015

Inexpensive Art Studio Storage ~ Pegboard

My art studio was a mess. Like every artist, I was constantly accumulating paints, brushes, and anything I could paint. (Furniture, little boxes, rocks...)

While cruising Pinterest, I came across the a pegboard with a DIY frame. It gave the board a finished look so I just had to make one!

Off to Lowe's to buy a pegboard and some molding I could use as a frame.

For the board, I thought about using a lot of colors, but worried it might look messy once the tools were hung on it. Instead, I put a coat of white paint over the board for a clean look. I used one coat of basic white and applied it with a roller. I had paint brush nearby in case the little holes clogged but it really wasn't a problem.


Since I've never used a power tool in my life, my husband cut the molding to make the frame. A bright blue (Exotic Blue) spray paint for the frame took about 3 coats to cover. There was also some touch up to get the paint to look smooth and even.

Let it dry overnight and then used wood glue to get the frame to fit and then nailed it together.

Instead of attaching it to the wall my inventive husband used aluminum T-stock to attach the pegboard to my workbench.  

                       Another quick trip to Lowe's for a pack of pegboard hangers                             and here's what I got. Organized and ready to paint! 

Tuesday, September 15, 2015

How Should You Plan Your Canvas?

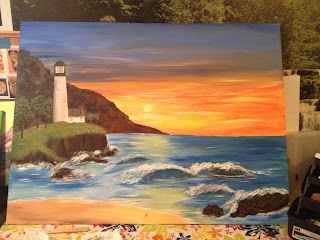
Ignoring the basics was my biggest mistake when I started a big canvas. I wanted to put a lighthouse, cliff, rocks, and a beach. What I should have done was sketch it onto the canvas. What I did was just start slapping on the paint.

The result was an uneven horizon line, an out of perspective lighthouse and waves that didn't make sense. The sky has a bit of a transition problem, too. All on a large 3' x 4' canvas.

However, it needs fixing. A wise artist friend once told me just watching the work will go a long way in getting the brain to click and the answers to come.

So I'm staring...waiting...and knowing it will click sooner or later. I really don't want to give up.

Planning, it's all in the planning...

Next time I'll do the sketch first and maybe the outcome will be better. 

 How do you plan your canvas? Sketch it out or just slap on the paint?

Sunday, September 6, 2015

Bookcase Makeover

 I have this old bookcase, once painted white to match my daughter's room. She's grown up and moved out and I had to do something with this well worn, yet sturdy piece.

First, I pried off the back and sanded down many layers of paint. Then, two coats of semi-gloss paint in a bright color on the frame (in my favorite color.)


While that was drying I got out some craft paper and Mod Podge. I've never used this stuff before so it was a challenge. I laid out my paper and trimmed the edges to fit. I spread some Mod Podge with a fine paint brush and carefully laid the paper down and pressed out the air bubbles. Once it was in place and looked good, I moved on to the next sheet.

After all the paper was Mod Podged down, I put two coats of Mod Podge over the whole thing.

Confession; After getting them all down with the Mod Podge the first time, there was a major air bubble on the middle of one sheet. I made the big mistake of trying to smudge it out when it wasn't quite dry yet and ripped the paper. ArrGGGhhh! I had to peal that piece off as best as I could, sand a bit, wipe it down and then put on another sheet of craft paper. Good thing I bought extra!

Once finished I let it dry over night. If this had been a table or something that would have gotten a lot of hands on wear and tear, I would have let it dry for 4 days and then put on a more protective finish.  Back of a bookcase? I nailed it back together the next day. And here you have it!

 If I had it to do over again I might have YouTubed how to do Mod Podge and maybe avoided my air-bubble mistake.

I'm using this for a storage shelf in my art room and I'm pretty happy how it came out.

Now I've got my eye on that worn little end table in the living room....

Happy painting!

Wednesday, August 26, 2015

Crayon Artist - The Amazing Don Marco

Confession: I have a box of crayons and I love them.
Perhaps because crayons were the first real art tool I ever used, my heart waggles a little when I spot a box of Crayolas.

Although the melted crayons are kind of kool when done right, we're not going there today...

Hold on to your Crayolas! 

You ain't seen what can happen when a box of Crayolas land in the hand of a master crayon artist!

Don Marco (Awesome website here) creates lifelike pictures of animals, Native Americans, and much more with Crayolas.
 Using just Crayola crayons,  Don Marco creates portraits that look so lifelike you want to reach out and touch them.

Aside from portraits, Mr. Marco also does scenes from the old west, beach scenes, animals and celebrities.


His original artwork goes for upwards of a few thousand dollars but he does have prints at a reasonable price. You can check out what he has for sale when you click on this Originals for Sale at the top of his page.

Go check out his site and I know you'll be rushing to the store to get some Crayolas!  I've got a long way to go before I get to the level of Don Marco but I'm having fun with the journey.
And no, I don't know what's going on with foxy's nose, but I still had fun. :) 


Friday, August 21, 2015

The Art of Painted Furniture

One of my favorite types of art is painted furniture.

An old chair, painted black with a few bright flowers, a broken table put back together finds a peacock, or a Tiger brightens up a stool found at a garage sale.

Furniture art is one of my favorite prowls on Pinterest. Creative people have done amazing things with furniture found by the side of the road.

Home Talk is another great site where people share their creativity. Like Pinterest, Home Talk lets you search for anything. A step up from the photo gallery like face of Pinterest, Home Talk lets the artist/creator post the details of their design. You can post questions and usually the artist will answer. Home Talk alerts you with an email ( if you want) to let you know you have a response.

Creating art from plain old furniture is a great way to make a few bucks. Find a good piece of furniture. Make sure it's sturdy or fix it. Express your creativity all over it, and be sure to finish with an acrylic seal. (Polycrylic is my favorite to work with)  Now post your pics!

Some places to sell?

  • Etsy  (Just double check your shipping costs)
  • Facebook
  • Google+
  • Pinterest
  • Make a website or blog and post that on facebook. 
  • Find a gallery or craft store to display your artwork. 
  • If you're an avid painter (or team up with a creative friend) and can generate a decent amount of furniture art, check out local craft or art show. 
This weekend check out your local garage sales. Start small (Coffee tables, benches, end tables) and take your time to create the best piece you can. 

Happy Painting!