Showing posts with label acrylic paint. Show all posts

Monday, March 4, 2024

Tree of Giving - Hand Painted Mural

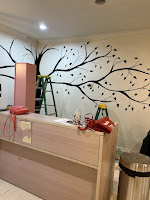
 A mural painted at a local dog rescue with my friend, Pam. This is in the reception area for the rescue building.   

This entire tree was done in black acrylic paint. The start was to center the trunk in the corner of the room. Then bring the branches out and up. (happy trees = branches up, spooky trees = branches hang down a bit) 


We did one side, then moved to the other the following day. Adding a few more branches and then the leaves. Most are kind of heart shaped. Start with a V at the end of the branch then round out the top and twist the brush to meet at a point at the end of the leaf. 

A few special touches! 

The third day was simply clean up and touch ups. The wall had a texture stucco and it was challenging to paint a straight line. 

Craft foam leaves will be used to mark donations. So supporters can add a leaf to our Family Tree! 


Finished! 


Three days of up and down ladders was exhausting but I think it came out okay. What do you think? 

Foster! Adopt! Rescue!

Monday, October 5, 2015

Pegboard Upcycling? Or DIY Liquid Courage?

I made a pegboard to store my art supplies and get them organized. You can see that pegboard here. 

I had half a pegboard left over. About 4' x 4', it was sitting here staring at me asking me to do something with it. :)
I didn't have room for another storage wrack, but I did have lots of spray paint so I took it out in the back yard and just started spraying.

After a while it looked like a face.... so I kept going.

Everyday after work I went into my studio and just layered on more paint. I knew I wanted bright colors and a lion.

So there was more paint...

Some squiggly brush strokes and more paint.


After a couple of days I wondered what I would do with it when I was done. But I kept going.
Painting on a pegboard is a challenge. All those little holes hold the paint and cause drips.

I kept painting.
I'm lucky my family understands me. . . or at least pretends to.


After a while I realized that the facial features would be a challenge due to the odd placement of the little holes. Ignore them and keep going? Work around them?

And now it's done and I still don't know what to do with it! But it felt good painting it and I kinda like his eyes.

ROAR!


Tuesday, September 15, 2015

How Should You Plan Your Canvas?

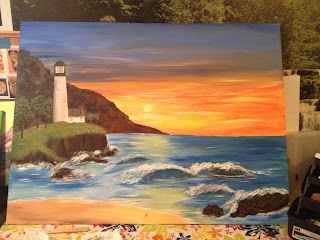
Ignoring the basics was my biggest mistake when I started a big canvas. I wanted to put a lighthouse, cliff, rocks, and a beach. What I should have done was sketch it onto the canvas. What I did was just start slapping on the paint.

The result was an uneven horizon line, an out of perspective lighthouse and waves that didn't make sense. The sky has a bit of a transition problem, too. All on a large 3' x 4' canvas.

However, it needs fixing. A wise artist friend once told me just watching the work will go a long way in getting the brain to click and the answers to come.

So I'm staring...waiting...and knowing it will click sooner or later. I really don't want to give up.

Planning, it's all in the planning...

Next time I'll do the sketch first and maybe the outcome will be better. 

 How do you plan your canvas? Sketch it out or just slap on the paint?

Thursday, April 9, 2015

Painted Chair

Found this chair in the supply shed at Artfully Repurposed, an artist shop in Middletown, NJ. Artist join and are welcome to sell their own art or take one of the items there and recreate it to sell in their shop. (More about this place in a future post!)

The chair a plain, wooden (brown) chair. Light scratches that could easily be sanded out, but structurally sound. If you lifted the seat it would fold up. Nice feature! I knew this would be an easy fix up so I took it home.

First out came the sanding block and I gave every inch a light sanding. A damp wash cloth was used to wipe it down. (Wiping down after sanding is an important step or the paint will look fuzzy.)

Next step? Black gloss spray paint! Work slowly and give the chair two or three light coats until every space is black. Let dry overnight.

Now for the flowers. I worked simply and used white paint to block out where I wanted the flowers and leaves. Let dry. Then I painted the flowers and leaves on. Let dry overnight. Spray with a high gloss acrylic sealer.
Simple! Done!

I put this chair up for sale at Artfully Repurposed, but kind of wish I kept it. I loved the bright flowers on the black background. now I'm on the lookout for another chair I can do this too again.