Sunday, July 12, 2026

ACEO Artist Trading Cards - Miniature Art for Everyone

 They're tiny, they're beautiful, they're ART!

Recently discovered ACEO Trading cards. Look on Ebay, Etsy, and even Amazon to find these amazing original paintings. You can bid on them or purchase outright.

ACEO's are a great way to support your local artist. Just go to Ebay, Etsy or your fav shopping spot and type in ACEO cards to see what's out there. 

Or go to my shop: 

https://www.ebay.com/usr/jeannegal


Sunday, April 13, 2025

Instant Download Art & Coloring Books on Etsy

 The world is going digital and I'm seeing everything from Art to


Planners to Coloring Pages for the kids. (That would have been real handy when my kids were younger!) I've also seen activity sheets and placemats you can print for the kids to color on. 

  Then there's the Art work. In a word; Wow! They've got some amazingly beautiful art on Etsy that you can download and print from your own computer or they give you a file sized to send to a printer (Walgreens, Walmart, or any of those other quick print places) Print in 8.5" x 11" or larger - poster size. 


Some inspirational and some just plain funny. (and I love cats!)

  Now with Easter here these would be great to give as gifts or download some fun stuff for the kid's table. 


Although painting is my main passion. Working with some digital art is fun, too. Check out my new Etsy Shop here; Daydream Arts. I might eventually be getting my paintings up, too. 


If you have an Etsy Shop drop your link in the comments! 

Monday, March 4, 2024

Tree of Giving - Hand Painted Mural

 A mural painted at a local dog rescue with my friend, Pam. This is in the reception area for the rescue building.   

This entire tree was done in black acrylic paint. The start was to center the trunk in the corner of the room. Then bring the branches out and up. (happy trees = branches up, spooky trees = branches hang down a bit) 


We did one side, then moved to the other the following day. Adding a few more branches and then the leaves. Most are kind of heart shaped. Start with a V at the end of the branch then round out the top and twist the brush to meet at a point at the end of the leaf. 


A few special touches! 

The third day was simply clean up and touch ups. The wall had a texture stucco and it was challenging to paint a straight line. 

Craft foam leaves will be used to mark donations. So supporters can add a leaf to our Family Tree! 


Finished! 


Three days of up and down ladders was exhausting but I think it came out okay. What do you think? 

Foster! Adopt! Rescue!

Saturday, June 24, 2023

Paint Up that Old Chair

 Let's face it. Everything can be a canvas. I especially like painting on things. It's a challenge to see what you can fit in the space allowed and putting your special touch on an object. 

Chairs are a perfect space to get creative on.  

These chairs were kind of beat when I first got them. One was found on the side of the road, two were found at a local thrift store. Most thrift stores sell that odd chair cheap. A set of four might sell for more but one? Grab that deal! 

These three chairs got the beachy treatment. First I did a coat of spray paint to give them an even white coat of paint. (Sorry! I didn't take before photos) I also had to reinforce the dog beach one because a leg was loose but that was an easy fix - I got my husband to do it. 😁

Next I started with the basic beach scene. Pick your horizon line. This cannot be in the exact center. It's always good to go a little below or above that center mark.

I think beaches are easy because it's basically horizontal lines of color. Blend the sky and sea and put on a beach. Ripple of water foam, maybe a palm tree or palm leaves. Done. 

After the painting is dry I seal the chair with a waterproof acrylic sealer. Be sure to spray all sides of that chair to ensure good protection.

This is my foster failure Maggie Mittens admiring her silhouette on the Dog Beach chair. This chair will be donated to a dog rescue to sell in their thrift shop. 

Woof! Good dog! 

Sunday, January 16, 2022

Keeping Crafty in a Busy Life

 I recently moved to Florida so life's been a bit hectic. Working, settling in and all that stuff. Then there's that nasty covid thing. So far we've been lucky and vaccinated, but still it's a big issue in meeting people and making friends.  

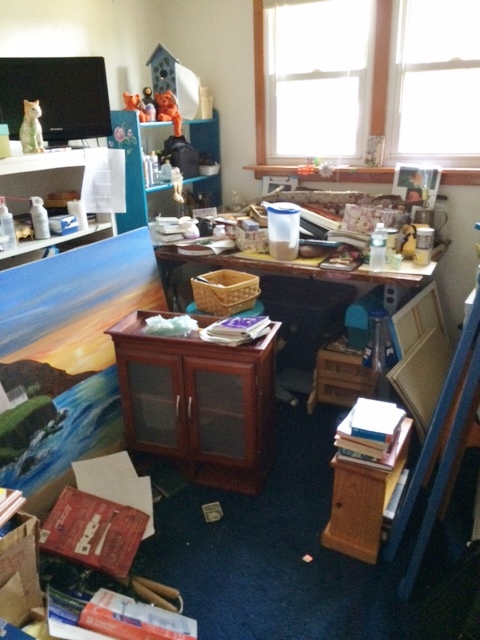
I've still been painting and trying to keep crafty but it is a challenge. The house we're renting is small and my craft room is a jumble of stuff that doesn't fit any place else. Isn't that always the way? It's like the world sees our craft rooms as that spare place to store stuff. Frankly it messes with my creative flow. It's like writer's block. Crafter's Block? That has to be a thing. Most of the stuff that used to be out and in sight is stuffed in a box and crammed into a closet. 🤦

One of these days I'll reveal the before and after of this craft/office/storage fiasco when I can figure out how to reorganize it (again.) But right now it's just too much. 

And my piano desperately needs tuning. - but that's another topic. 

Then I painted sunshine gnome just because. 


Friday, October 1, 2021

One Aimless Writer: NANOWRIMO Approaches... Are You Ready?

One Aimless Writer: NANOWRIMO Approaches... Are You Ready?:  Love this time of year when we prep for NANO.  What? you don't prep for NANO?  I guess it comes down to a plotter or a pantser or even ...

Wednesday, December 30, 2020

Easter Porch Board - Admitting Mistakes

Needs work! 

This is a four foot board about 10" wide. 
First it was washed with light blue. Let that dry. Then sketched the Gnome in chalk. Mistake? I used bright pink chalk that was hard to cover & hard to wipe the extra off. 
After sketching it was just coloring in. 

If I had to do over here's my list of needed corrections or changes;

Darker background
Hat bigger/longer
Background beard with violet before adding long white hair so it has more depth. 
The green in the hat needs to be smoother. 
Lettering would have been better if the background was darker or done on the Silhouette so they're more even.
Easter Egg needs to be decorated. 
Hands outlined

When working in a width of 10 inches you have to keep everything narrow. If I was painting this on a wider piece I would have had more room to make the hat a little floppy and made ears angle off to the side and maybe a few more eggs around him. I did decide on purple shoes because there's a little green grass by his feet. I almost gave him a pink hat but that would have had to be darker than the ears and nose. Not sure that would have popped too much/little. 

Next? I need a bunny on a porch board. 


Sunday, May 31, 2020

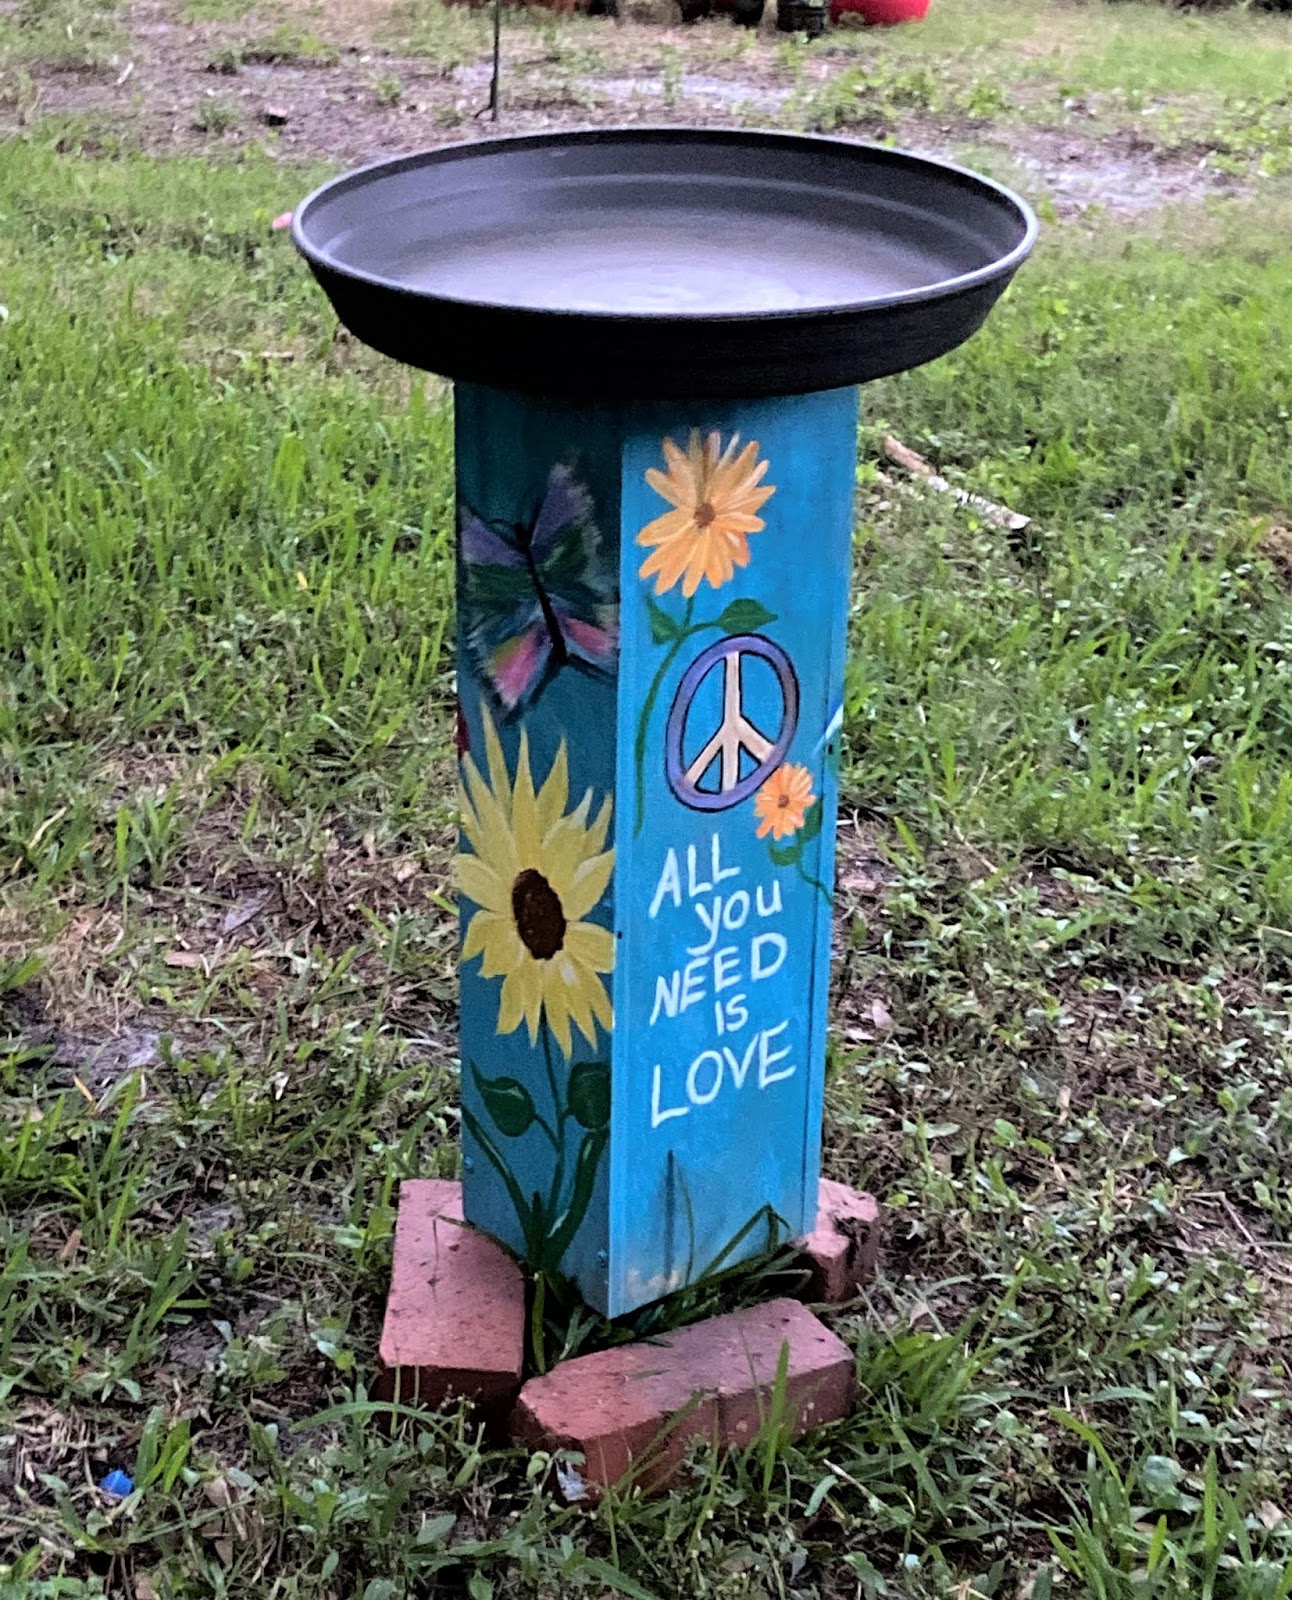
Bird Bath Cover Up

There was this ugly sewer tap in thing in our back yard. I hated it from the minute we moved in and thought long and hard on how to cover it up.

So, what does every back yard need besides a bird feeder to attract those cute little feathered beauties? 

A Bird Bath, of course! 

Hubby made this box from plywood. Just cut four equal pieces and nailed them together to fit around that sewer pipe.

Next; Bright blue spray paint. 

Then I took chalk and drew some flowers and birds and painted on some whimsy. 

After it was all done I used a spray sealer with UV protection so it would withstand the rain and sun. 

Once that was dry we glued on one of those bottoms to a flower pot. I think it was maybe $3 in Lowes. We used an all weather glue to hold up to the elements. 

Finished! Easy Peasy Bird Bath Cover Up! 

Monday, November 11, 2019

Craft Room Re-Do

I moved 900  miles in the last year and my old craft room is still in boxes. :(

Our temporary home is only two bedroom and my hubby thinks we should share that room as an office.  >insert hysterical laughter here<  However can we really share our craft room? I mean, isn't space necessary to spread out all our goodies?

So I waited. Set up my desk in the corner, put up my peg board (A BIG must have for any craft room) and waited.  I wanted to see how much space I'd actually have to give him. I mean, all he does is work on the computer so why does he need a room? Or even part of a room? Isn't the kitchen table good


enough?

It's been a few months and he's shown no interest in the room. Mostly it's just a pile of (my) boxes. Maybe that threw him off? If I have all these boxes maybe the kitchen table is looking better?

So, I'm going to attack that room and set up my stuff. I'll need my work bench first. Which he has to put together - I'll work on that - and need to fix the storage. When I moved I gave away my cubes and for the life of me I can't remember what happened to my other storage stuff.  Hey, 900 miles is a long trip. Did I sell this stuff at a garage sale? Give it away? Is it in one of these boxes?
I have work ahead and I'll be posting progress reports as I go.

Wish me luck!

Tuesday, September 17, 2019

Hooked on Paint & Sip

I have to admit I'm hooked on these paint & sip places. They're much better than sitting in a bar or just going to a movie. I mean, I love movies, but it has to be the right one. There are so many duds among the great ones.

So, these places where they show you how to make a painting while you sip some wine (they have beer, too!) are the perfect mix between a nice night out with friends and trying something new.

I did the lion and had a great time. Now he's hanging in my office. :)
Monet's Waterlilies were next. That's now hanging in my kitchen.

Tomorrow they run a special and now I really want to paint this dandelion!
There's an old saying; Some see a weed, some see a wish. It's about perspective. Like the world show's you things and you can make the best of them. I love that. If I ever get another tattoo it would be a watercolor dandelion with the words "See the Wish" under it.

So, I think this painting is talking to me. Check it out here.
I gotta make some phone calls and see who wants to go!
See the Wish!

Saturday, February 2, 2019

Palm Tree Husk Painting

Palm husk base paint.
(ignore the whale, he's not done yet)
Since moving to Florida I've discovered Palm Tree Art. It's the husks that palm trees shed throughout the year that people collect and use to create great works of art. So I just had to try!

I've been scanning the ground around here for pieces of palm trees. This husk I found out by a pond near where I live. It was a pretty solid piece. The edges were a bit fragile so I had to trim a few pieces off but wanted to leave it as natural as possible.

After coating it with a mix of grey, white, and dark blue I let that dry.

Then I started putting in the details. The eyes were the hardest part to get even. The husk has a big ridge down the center (which is why it fit the elephant face so well) and trying to get them even was a challenge.

The same challenge was there in trying to make those lines across the trunk to give that wrinkly elephant skin look. After trying a liner brush with limited results I got out a small fan brush and went back and forth putting in this guy's wrinkles.

To finish, I sprayed it down with a satin finish acrylic sealer. To hang I'm going to glue some self leveling hangers and then run a wire through them. I don't want to put holes into the husk because it will show on the front. 

So here's the elephant! What do you think?

Saturday, July 14, 2018

Rose Painting?

I went to an in-house paint and sip last night. The teacher brought us roses! Yay!
We had to paint the rose... oh no....
I can't paint roses. They come out a garbled mess of lines that go no where, but I soldiered through.

Now this paint night had no rules. We got the basic architecture of the rose and how to paint and blend. We had our roses and photos (with quotes! I love quotes!) Then off we went to interpret the rose however we wanted.

There were new and experienced painters and lots of laughs. We came to the conclusion that roses are a hard flower to paint! Yet, the spirit of Valentine's Day called and we painted.
I can't show you mine...it was bad!

I stared at it all day today thinking...how do I fix this?

So to google I went! And found this video on painting a rose;
This guy's got talent!

Monday, February 5, 2018

Painting Dragonflies & Sunflowers

It's just a cold, blustery day in the north east and there's no way I wanted to brave the frigid temps, so it was either work on my next book or pull out the paint.

Guess which one won? :)

This canvas had another painting on it that just wasn't working out. So I mixed some green, blue and yellow and blocked out the old stuff.

Then did the center of the flower in shades of brown, yellow and black. The petals were done in two shades of yellow and green. A little of the brown mixture was streaked up through the petals for texture. The dragonfly (first time I ever painted one!) was done in light and medium purple, blue, black, and white.
Sometime ya just gotta have some fun. 
Paint on my friends! 


Sunday, January 21, 2018

Faded Garden Table Redo

A while a go I did this table with stain. It was a technique I saw in several sites on the internet and it was surprisingly easy to do.
My fail? I left the tables out year round and in Jersey, winter can do nasty things to art work. Did I not seal them good enough? Was it an especially harsh winter? Probably yes to all of the above. :(

So, I've been wanting to update it and didn't think the stain would work again so I dragged out my acrylic paint and a can of clear sealer and went to work.

First I sanded the top to have a smooth canvas. Then painted the top black so I'd have a good base and maybe the paint would help seal the wood a bit so I could work on it.

Next I filled in the peacock body in with a couple of shades of blue to give it some texture.
The green feather-like area was put in with strokes of green, yellow, and purple. After the wavy lines were in place and still wet, I dipped a paper towel in water and dragged it from center to the outer edges to get a blurry streaked effect.

Next the eyes of the peacock feathers were painted with a blend of orange/yellow, a heart shaped blue, and purple dot.  After that dried, long wavy lines were shadowed in to create that feathery look.

On the blue body, the eye was painted in yellow for the iris and outlined with white. The beak is an off white. The hair like spikes on top of the head were outlined in black and highlighted with a blend of yellow/orange (heavy on the yellow) Dots were placed on top of the spikes in white, purple and yellow. 

For the body lines of purple were placed just to give it a little feathery effect (without actually painting feathers.)

Three coats of sealer were sprayed over the top and sides to (hopefully) give it some protection from the elements.


Saturday, January 6, 2018

Snow Days & Frigid Temps

Here in the North East we're in below 0 temps and hiding in the house. Fire in the wood stove, wine is poured and it's a great time to CREATE!

We're looking to sell our house and move so my art studio is packed up in boxes. Wahhhaaaa!

So my awesome family got me a few things for Christmas. Brushes, canvases, and an easel. All I had to get was some paint. Forgive the quick pics. I'm not sure what I'm going to do with these yet, might just go in the closet with the rest of the artworks. :)

As the temps drop, I'll be filling some canvas with day dreams.


How's by you? Keeping safe and warm?

What's your cold weather craft?


Wednesday, October 26, 2016

Trunk or Treat? Let's Buzz!

Next up for the Trunk or Treat project: GIANT BEES! 
Two Bees
2 yellow plastic table cloths from the dollar store
1 Black plastic table cloth from the dollar store
2 pair of large googly eyes 1/2 price at Walmart
Masking tape and Packing tape
Black and yellow pipe cleaners
Newspaper
Glue gun

First lay out a sheet of paper and then scrunch more newspaper over it. When you have enough for a body wrap the bottom newspaper around the scrunched up stuff and use masking tape to secure. Squish and shape into the body of a bee.
(From the first bee I discovered it's better to wrap the outside of the newspaper body in something with a solid color or the print shows through) Put a layer of paper towel over it to hide the print. Fold the table cloth in half and roll your newspaper bee body up in it. Secure with clear packing tape. For the tail, use the extra table cloth at the end of the body and twist it tight, trim to a point, then wrap in packing tape. cut 2 small strips of duct tape to make the stripe.

To make the black strips on the bee body I used black duct tape.
Construct your head the same way but cut a square of the black table cloth to fit over your bee head. Before taping figure out where the antenna will stick out. Cut small slits. Wrap the head and secure it with tape at the back. Flip over and insert antenna's. A dab of hot glue will hold them in place.
I used Turbo Tacky Glue to glue the eyes in place. A quick slash of yellow paint for a cute little mouth.
I originally tried gluing the head to the body but it wouldn't stick. I don't know why, maybe not enough air to dry the glue? So I used packing tape. :)

The honeycomb is just poster board and little bees as explained in the previous post. Of course I had to add some cute saying found on that Internet. SAVE THE HONEY BEES! BE HAPPY! BEE KIND!

You got  a bee-utiful Bee-mobile!


Wednesday, October 19, 2016

Buzzing About Trunk or Treat!

 Confession; I drive a bright yellow car. :)
So, when my job invited each department to participate in a community Trunk or Treat I figured I'd go with the theme of my car.
Bee Happy!
So, here's the start of what's going to be my Trunk or Treat car.
First some pom poms and Turbo Tacky Glue (Love this stuff!) I glued them together and set them aside to let them dry.
 Next I cut up an egg carton and painted them yellow with black stripes to look like bees. (Found this one on Pinterest. Love that site!)
After they dried,  I took two pipe cleaners and twisted them together to make legs. Then came the hot glue gun. My gun is really old and I burnt the heck out of my hand. I think it's time to get a new glue gun!
 I glued on the legs and eyes. Using an exacto knife I made holes in the head part and threaded a half a pipe cleaner through to make antennas.
So, this is where I am so far with my Trunk or Treat car. Next giant bees and a poster of a honey comb.  The giant bees should be should be ready to go by tomorrow. Right now they're lying in pieces on my kitchen table. Although my wing plan for them didn't work, I'll probably make some from poster board. It will be fine as long as it doesn't rain....


Wednesday, September 28, 2016

Fall Project Check In

Hello Fall! Beautiful season of orange and yellow! My two favorite colors!
Now what can we make for Fall, Halloween, and Thanksgiving?

I was in Lowes and saw this great topiary of 3 pumpkins stacked up in a plastic vase. It had some fall foliage and I thought that would look great by my front door. Then I looked at the PRICE!
Oh! Big Ouchie!
Sorry, no way was I going to pay that much for something I could do cheaper. Also, in making it myself, I could put my own signature on it.

The pumpkins aren't available in any of the dollar stores around here but Michael's has them for 50% off. Still kind of too much. If I'm going to make these, I want a good deal. If the prices aren't more reasonable by next week, I'm going to have to figure out another pumpkin idea.

Moving onto Halloween...MY FAVORITE!

I have two plans for outside;
      Underground trap;
           This will entail a pallet, some lights, and some plastic bones.

      Spiderweb of Death:
            Make giant spider web either from trashbags or see what the dollar store has in stock.
              Fake spider web (from the dollar store)
             Cheese cloth
             Newspaper
             Tape
October is this weekend...it's time to get your goul on! Check back soon for an update!

Saturday, August 6, 2016

St Patrick's Day in August

We were having a St. Patrick's Day party in August at work and you know what? It's almost impossible to find St. Patrick Day decorations in the middle of summer. So I decided we needed something creative.

I bought a piece of wood at Lowes, it was thin, RevolutionPly 5mm. My husband cut it in half and we glued the two pieces together to make it stronger. Then he screwed 1" x 2" boards around the outside edge for extra reinforcement.

For the stand he cut two triangles out of plywood (1/2 in thick) and cut slots in them so the board would slip in to stand up.

Once we had the board all put together, it was time to lay out the design. I wanted the the Leprechaun faces cut out so people could get behind them and take photos. So I sketched the picture with a piece of chalk and my husband cut the faces out.

Now it was time to paint.

Confession; Lowes was selling the Valspar paint samples for a buck...OMG! I had a big background to paint so this was a great economical find. It was hard to restrain myself to just a few. I think artist everywhere were dancing.

Then it was just paint...and touch up...and touch up

 I used my Silhouette Cameo to cut vinyl for the Happy St. Patrick's Day" and e shamrocks and put them on the final picture.

To add a little dimension I used Washi Tape from Michaels for the front of the Leprechaun's vest on the left and some gold ribbon for the front of the vest for the Leprechaun on the right. I glued them on with Tacky Glue and taped the ribbon until the glue dried.


Happy St. Patrick's Day in August!